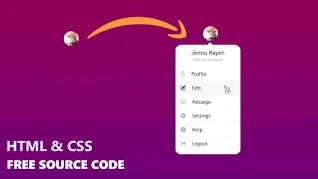
User account menus are a crucial part of many websites, providing a convenient way for users to access their profiles and settings. In this tutorial, we'll walk you through the process of creating a user account dropdown menu using HTML, CSS, and JavaScript. Elevate the user experience of your website by adding this functional and stylish element.
Step 1: HTML Markup:
Start by setting up the HTML structure for your user account dropdown menu. You'll need a container for the menu and its trigger, such as a user icon.
<!-- -------------------- HTML -------------------- -->
<!DOCTYPE html>
<html lang="en">
<head>
    <meta charset="UTF-8">
    <meta name="viewport" content="width=device-width, initial-scale=1.0">
    <title>User Profile Animation</title>
    <link rel="stylesheet" href="style.css">

    <link rel="stylesheet" href="https://cdnjs.cloudflare.com/ajax/libs/font-awesome/6.4.2/css/all.min.css" integrity="sha512-z3gLpd7yknf1YoNbCzqRKc4qyor8gaKU1qmn+CShxbuBusANI9QpRohGBreCFkKxLhei6S9CQXFEbbKuqLg0DA==" crossorigin="anonymous" referrerpolicy="no-referrer" />
</head>
<body>

    <div class="account">
        <div class="profile">
            <img src="image/img.jpg" alt="">
        </div>

        <div class="menu">
            <h3>Jennu Rayen</h3>
            <p>Web Designer</p>
            <ul>
                <li>
                    <i class="fa-regular fa-user"></i>
                    <a href="#">Profile</a>
                </li>
                <li>
                    <i class="fa-solid fa-pen-to-square"></i>
                    <a href="#">Edit</a>
                </li>
                <li>
                    <i class="fa-regular fa-envelope"></i>
                    <a href="#">Message</a>
                </li>
                <li>
                    <i class="fa-solid fa-gear"></i>
                    <a href="#">Settings</a>
                </li>
                <li>
                    <i class="fa-solid fa-circle-question"></i>
                    <a href="#">Help</a>
                </li>
                <li>
                    <i class="fa-solid fa-right-from-bracket"></i>
                    <a href="#">Logout</a>
                </li>


            </ul>
        </div>
    </div>
    <script src="script.js"></script>
</body>
</html>
Step 2: Styling with CSS:
Create a separate CSS file (style.css) to style the user account dropdown menu and its appearance.
/*-------------------- CSS --------------------*/
/* style.css */
* {
    margin: 0;
    padding: 0;
    text-decoration: none;
    list-style: none;
    box-sizing: border-box;
}

body {
    min-height: 100vh;
    background: linear-gradient(#970053, #69007e);
    font-family: 'Trebuchet MS', 'Lucida Sans Unicode', 'Lucida Grande', 'Lucida Sans', Arial, sans-serif;
}

.account {
    position: relative;
    top: 20px;
}

.profile {
    position: absolute;
    top: 0;
    right: 30px;
    width: 60px;
    height: 60px;
    border-radius: 50%;
    overflow: hidden;
    cursor: pointer;
}

.profile img {
    height: 100%;
    width: 100%;
    object-fit: cover;
}

.menu {
    position: absolute;
    width: 260px;
    background-color: white;
   top: 100px;
   right: 15px;
   border-radius: 20px;

   visibility: hidden;
   opacity: 0;
   transition: 0.5s;
}

.active{
    visibility: visible;
    opacity: 1;
    top: 75px;
}

.menu::before{
    content: "";
    background-color: white;
    width: 15px;
    height: 15px;
    position: absolute;
    top: -8px;
    right: 35px;
    rotate: 45deg;
}

.menu h3{
    font-size: 1.4rem;
    text-align: center;
    margin: 18px 0 5px;
}

.menu p{
    font-size: 1rem;
    text-align: center;
    color: #b9b9b9;
    margin-bottom: 20px;
}

.menu ul{
    margin-bottom: 20px;

}
.menu ul li{
    padding: 15px 20px;
    border-top: 1px solid #33333310;
    background: #ffffff;
    transition: 0.5s;
}

.menu ul li:hover{
    background: #e7e7e7;
}

.menu ul li i{
    font-size: 1.3rem;
    color: #b4b4b4;
    transition: 0.5s;
}
.menu ul li:hover i{
    color: #111;
}
.menu ul li a{
    font-size: 1.3rem;
    color: #292929;
    margin-left: 20px;
}
Step 3: Adding JavaScript Interaction:
Create a JavaScript file (script.js) to handle the dropdown menu's visibility.
//-------------------- Java Script --------------------//
let profile = document.querySelector(".profile");
let menu = document.querySelector(".menu");


profile.addEventListener("click", ()=>{
    menu.classList.toggle("active")
})
Congratulations! You've successfully created a user account dropdown menu using HTML, CSS, and JavaScript. This functional and stylish element can enhance the user experience of your website by providing a convenient way for users to access their profiles and settings.
Feel free to customize the colors, fonts, and other styles to match your website's design. You can also explore additional JavaScript features to add animations or other interactions to the dropdown menu.
By following this tutorial, you've gained a valuable skill in web development that can help you create more user-friendly and visually appealing interfaces. Implement this user account dropdown menu on your website to provide a seamless and efficient way for users to manage their accounts.


0 Comments